DNS Rebinding Attacks — How do they work?

DNS rebinding attacks seem rather trivial to exploit once you get someone to click your link or visit a site that you have a banner ad on, but the behavior required by the authoritative DNS server is what I want to understand. Let take a look:

It seems like it would require an unusually coordinated effort on the part of the initial malicious website and the corresponding authoritative DNS server. 

How does victim make a request to malicious dot com, receive a DNS message with the IP address of malicious dot com, then send out a refresh request to malicious dot com because of the very low TTL and get a response containing the attack payload? — This needs to be figured… 

It seems like the attack vector requires victim interaction with an initial HTTP request through social engineering, a specially configured DNS server and an advanced knowledge of the victims interior network. 

How are these things managed?

We get the malicious request that serves up malicious dot com — and it can embed a JavaScript scanner in it to do discovery, per this website here: 

http://rebind.network/rebind/index.html, courtesy of Brannon Dorsey where his site scans for some well known IoT devices. The way this is accomplished is also very interesting as the browser is able to collect information about your network hosts through a side-channel discovery technique which allows it to find out if something is at a particular address by making a request to it and gauging the response time — no content would be discovered at this time as the Same Origin Policy will prevent that, save the website has CORS enabled.

So, we have established the method of ingress and discovery, but still not the tooling of your DNS server to serve up the locally addressed DNS message attack payload. How is this done?

And we found something awesome! Here is a complete framework for setting up this attack:

— https://kalilinuxtutorials.com/singularity-dns-rebinding-attack/

Okay… pay dirt. This is what I was looking for. When you implement this framework, you are deploying a dynamic DNS service that can be configured based upon a host and timing strategy that you can designate. This is how you get the DNS server to play ball when it comes time to poison the victims DNS cache by serving up a subsequent request that points into their own network.

When the service is launched, you get full access to DNS twisting functionality that you can see in the instructions to set it up:

Launch the Singularity binary, (singularity-server), with the -h parameter to see its parameters.

DNSRebindStrategy string : Specify how to respond to DNS queries from a victim client. The supported strategies are:

  • DNSRebindFromQueryRoundRobin
  • DNSRebindFromQueryFirstThenSecond (default)
  • DNSRebindFromQueryRandom
  • DNSRebindFromQueryMultiA (requires Linux iptables)

This represents the gearbox for how the DNS cache on the victim host is poisoned when reaching out for another FQDN hostname resolution after the 10 second TTL message has indicated its expiry. Brilliant


Implementing Custom AWS CloudWatch Metrics

Flip a couple of switches in your AWS console, right? Wrong! It is so much cooler than that!

In exercise 5.3 of the AWS CSA Associate exam, there is an exercise which really wants you to stretch your wings. That is what I love about this book; getting the most out of this book requires you to use resources outside this book.

The goal of the exercise is to import custom metric sources from your EC2 instance that are not available from the CloudWatch console. What is interesting is that I only have a few instances across my AWS ecosystem, but I already have a choice of 200 metrics to dig around in, mostly from the EC2 namespace. My first thought runs to the kinds of tool sets that you will need to be running to make sense of all the data in your average Enterprise AWS environment…

First things first: Second things come later, if ever.

  1. You need to install a few Perl libraries: libwww-perl and libdatetime-perl. Yep, the AWS guys opted to use Perl to bridge the gap between your virtual boxes and their hypervisor. Cool.
  2. Download the scripts package from Amazon here:https://aws-cloudwatch.s3.amazonaws.com/downloads/CloudWatchMonitoringScripts-1.2.2.zip
  3. Grab your keys from a user whose role is either admin or has the appropriate cloudwatch:put/get/listmetrics permissions. The EC2:DescribeTags permission might be nice too. Take those keys and insert them into the awscreds.template file and then change the extension from template to conf.
  4. Boom! You’re ready to go. I fired up this agent by using the ./mon-put-instance-data.pl -mem-used-incl-cache-buff -mem-util -mem-used -mem-avail command, and it gives me all the memory usage data points that I could ever want. At this point, you will find them in the metrics section of your CloudWatch console.
  5. A best practice would be to set a cron job for a much more frequent update by editing the crontab file and setting in this:*/5 * * * * ~/aws-scripts-mon/mon-put-instance-data.pl –mem-used-incl-cache-buff –mem-util –disk-space-util –disk-path=/ –from-cron

Most of this is documented very thoroughly on the AWS Docs site here, but it will lack the motivational empowering rhetoric and sound effect footnotes.

https://docs.aws.amazon.com/AWSEC2/latest/UserGuide/mon-scripts.html


The Security Concerns of HTTP

As HTTP constantly evolves, so do the security concerns around it. I’m compiling a list of resources that I have been using in my study and reiterating some of the key concepts. Forgive the muddle as the organization of this article takes shape.

  1.  Security operates at multiple layers of an app:

– Application code
– Application configuration
– Web Server configuration
– Application Firewall
– Dependent hosts
– Client Side Security Controls ( browser sandboxing? )
– Logging Monitoring Alerting
- Deceptive Defense

2. Client Side Security Control example:

HTTP Response Headers instruct browsers to validate untrusted input, prevent executions and report incidents. Here they are:

– HSTS (RFC 6797) — good reading!!
– Public Key Pinning Extension ( HPKP )
– X-Frame-Options
- X-XSS-Protection
– X-Content-Type-Options
– Content-Security-Policy
– X-Permitted-Cross-Domain-Policies
– Referrer-Policy
– Expect-CT

3. XSS remediation in its entirety is a pipe dream. There are so many JS components that you will be using that can present ways for input to get into the app. This is why CSPs are used.

4. CSPs function is a few ways:

– Only load resources from current origin or domains listed in policy.
– Restrict by protocol, domain and path.

The issue with having a restrictive CSP is that in many cases, your bootstrapped code and javascript libraries are making calls to other sites for their functionality. Setting up a whitelisted CSP can break your site. Are your javascripts loading additional resources? You would need to whitelist them.

Checkout CSPvalidator.org: This is what I pulled back from www.yahoo.com:

Interesting directives in there: allow-popups-to-esapce-sandbox

I wonder what the ramifications for this could be? Thats an exploration for another day….

5. HSTS: a web security policy mechanism that helps protect websites against protocol downgrade attacks and cookie hijackjing. It automatically turns insecure links into secure ones. If the security of the connection cannot be ensured ( such as the cert is bad ), the connection is terminated. HSTS — jeez.. this could get its own learner section: turns out there is something called a ‘max-age Directive’ which specifies a time limit that the user-agent considers the responding host as a ‘Known HSTS Host’. HSTS has the capacity to fix SSL stripping MITM ( Moxie Marlinspike ).

HSTS headers can be stripped away by an attacker if it is the users first visit to a site. Some browsers have attempted to solve this problem by including a pre-loaded list of HSTS sites but this will not scale to the whole internet. HSTS can also help prevent session hijacking or credential theft by tools such as firesheep.

max-age
includeSubdomains
preload
TOFU problem – trust on first use

https://hstspreload.org/

5. Content Security Policy: 

A powerful header that aims to prevent XSS and data injection attacks by restricting JS and DOM execution elements. 

Declared by Content-Security-Policy or Content-Security-Policy-Report-Only

.

Requires careful tuning

, currently there is v1, v2, and v3.

Directives:

*-src : Define valid source of JS, images, CSS, etc.
nonce-* / sha256- (v3): Only allow is SHA value matches
strict-dynamic: Allow document.createElement(‘script’)

This article will continue to grow in scope and size. Please return on occasion to see how it gets built out.


——————-

——————-

Resources:

1. HTTP RFC: https://www.ietf.org/rfc/rfc2616.txt
2. HTTP Mozilla Reference: https://developer.mozilla.org/en-US/docs/Web/HTTP
3. HTTP Security Talk by Pedram Hayati of Ettlam https://www.youtube.com/watch?v=ZZUvmVkkKu4
4. Web Application Hackers Handbook

Setting up XAMPP for DV-Web Services testing

XAMPP — The cool localhost web server that has everything you need to test webservices – is a bit tricky to setup. Guidance from this page https://github.com/snoopysecurity/dvws gets you started. Here are the things to remember:

You have to clone the DVWS repo into the htdocs folder that XAMPP sets up during the install. When you have a successful install and you have gone to localhost:8080 and you see the pretty apache friends landing page, you are reading the index.php page that is in the htdocs folder.

Cloning the DVWS project into that folder is the tricky part. Where is the htdocs folder? How are we going to clone into it if we cant find it on the CLi? ( Always use the CLi. Its the rule… ) If you hit the explore button, it will open up the folder in the finder and then you can mav-Up from there which will get you to the virtual mount next to your HDD, but dragging the htdocs folder onto the terminal window reveals the complete path that you can use — filesystem access is granted through a hidden folder in your home directory — .bitnami


Seeing the /opt/lampp path was the lightbulb. There is no opt directory on the mac file system. This is a mounted drive that will be accessed through a virtual mount in your home directory. If you are not familiar with bitnami installations, this has a chance of holding you up.


Studying TLS 1.3 — Part 1: The New Handshake

The new TLS 1.3 protocol as seen in RFC 8446 can be described very well by looking at the new handshake:

Client: Key Exchange — Establish shared keying material and select the
cryptographic parameters. Everything after this phase is
encrypted. ( Spooky!

Server: Server Parameters: Establish other handshake parameters
(whether the client is authenticated, application-layer protocol
support, etc.).

Client: Authentication – Authenticate the server (and, optionally, the
client) and provide key confirmation and handshake integrity.

And thats it…

I would say that its quite an improvement over TLS 1.2. Lets take this apart and look at the differences between the constituent elements of the client hello.

TLS 1.2 Client Hello: 

The first HTTP packet to touch the server from the client is called the hello message. It consists of everything you may need to start an encrypted conversation:

A preferred protocol version designation 
A GMT time variable
A 28 byte randomly generated structure
A session ID 
A list of supported cipher suites 
A list of supported compression methods
Possible Extensions information 

Getting to this level of detail is only possible by going to the RFC pages ( Request for Comment — its like the internet Rosetta Stone  ) and reviewing the C code and its component expansions that the IETF explains pretty well. Its important to learn the C programming language — one reason in particular is that sometimes all the documentation you will have on something will be an implementation written in C. And the C language is so universal, it actually has an ANSI standard, the same way we have a standard for how long a meter is or how much a kilogram weighs — pretty cool huh? You can read more about it on the ANSI website or wikipedia.

So, speaking of implementations — this is now getting to the bigger picture for this read. Its critical to remember that as we learn about TLS and the comparison of 1.2 to 1.3, we are talking about standards. Lets take a look at the TLS 1.3 client hello:

TLS 1.3 Client Hello: 

A preferred protocol version designation for TLS 1.2 Backward Compatibility 
A 32 byte randomly generated structure
A legacy session ID – another BC component for TLS 1.2 
A list of supported cipher suites with PSK establishment 
Legacy compression methods – BC for TLS 1.2, otherwise one byte set to zero
Extension information

The modification to the TLS protocol shows up right away in the hello message as it will have already gone through the trouble of establishing a pre-shared key for the protocol it thinks the server is likely to support. This is the basis for the improvement model revealing  itself in the first hello message leading to a more performant interaction. Remember, there are only two more steps until a symmetrically encrypted link is established and communication begins.

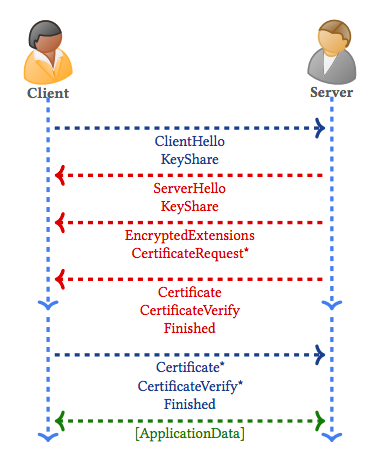
Below is an excerpt from a paper published by the University of Oxford on the scientific analysis of the TLS 1.3 standard using the Tamarin Prover by Cas Cremers, et al:

The default mode of TLS 1.3 allows for ephemeral Diffie–Hellman (DH) keys to be established either over a finite field or using elliptic curves. In an initial (EC)DHE handshake, as depicted in Figure 1, the client sends a ClientHello message containing a random nonce, i.e. a freshly generated random value, and a list of symmetric algorithms. The client also sends a set of DH key shares and the associated groups, KeyShare, and potentially some other extensions.

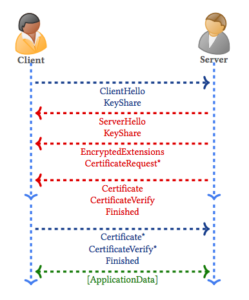
This is figure 1, taken straight from the paper in question.

The magic of this improvement lies in the assumption of a usable Key Exchange method that you can see when the client sends a ECDHE KeyShare in the first request along with its very small list of supported ciphers. This results in a 3 step handshake instead of twenty thousand or however many there were before. Massive improvement.

If you want to check out what I mean by spooky, I recommend watching a very succinct and clean review of Elliptic Curve Crypto with a good explanation of the math behind the Diffie-Hellman key exchange by Will Raedy: Link

On a final note before we move on…The important thing that I want to remember here is that regardless of this new standard, and regardless of someone saying:

I’m using TLS 1.3“,

you need to look a little deeper than that pretty little fractionated numeric value. When you look at little closer, you will find that TLS is a design standard, much like ISO27001 is a standard. Standards have versions, and they also have variability around the way they are implemented.

Go here:  https://tls.ctf.network  and watch what happens!

At the time of this writing, there is a script on the page that tests which version you are using. Visiting it with Chrome Version 68.0.3440.106 (Official Build) (64-bit), I got the following message:

You are connecting with TLSv1.3 Draft 23.

And….. whoah… Yesterday Firefox was connecting to said page and the message came back with Draft 28. Now the page wont even render… strange: FireFox Quantum version 61.0.2 seems to have a problem as Im getting a single line text in the response from the ctf domain that says:

You are connecting with TLSv1.2, you can enable TLS 1.3 using the latest Chrome Canary (chrome://flags/#ssl-version-max) or Firefox Nightly.

Firefox seems to be having strange difficulties of late….

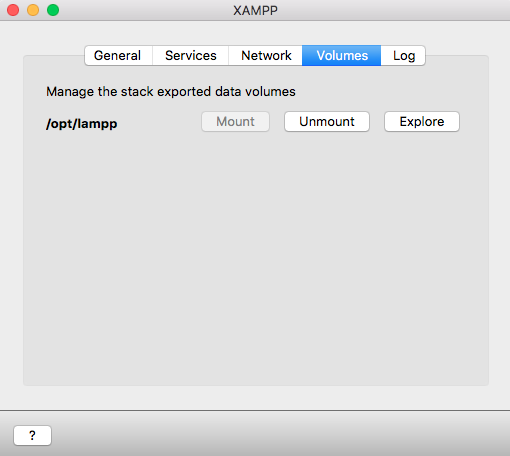
Anyway… Lets turn our attention over to the GitHub repo that manages all the mainstream TLS implementation projects here.

There are about 20 implementations there, each that specify the draft of TLS 1.3 from the IETF that they are using for their frame of reference. One in particular you may have heard of is BoringSSL, which was spawned by a fork from Google back in mid 2014 when they decided to sunset their use of OpenSSL. You can see they wrote it in C, they work with two drafts and they directly reference RFC 8446 ( don’t you just love those :).

Key takeaways:

  • TLS 1.3 is ready for action ( symmetrically encrypted communication ) within 1.5 round trips between the client and server. 1.2 was boasting 6 steps of communication.
  • TLS 1.3 accomplishes this feat by making a key sharing protocol assumption and packages a PSK using the Diffie Helman protocol and available cipher suites.
  • The Cipher Suite options make this really exciting because instead of 317 there are five.

Some things we will look into in our part 2 article:

P-256
X25519
HelloRetryRequest
resumption
0-RTT
KeyUpdate

Spooky! 🙂

TLS 1.3 is here. Why? — Ya suspect!

I was reading up on the new spec for TLS 1.3 and I caught a snippet of text that stuck out.

“TLS 1.3 also enables forward secrecy by default which means that the compromise of long term secrets used in the protocol does not allow the decryption of data communicated while those long term secrets were in use. As a result, current communications will remain secure even if future communications are compromised.”

Current communications will remain secure? I would sure hope so! What are they talking about? Why would we need to worry about current traffics remaining secure in the future?

I smell something cool about to be learnt here. Put your thinking gloves on and keep your ears to the grindstone cuz’ here we go!  (“Ya Suspect!”)

Lets see if we can take this apart as it is eluding to several things:

Forward Secrecy: ( or Perfect Forward Secrecy ) Implementing the use of an ephemeral shared secret for encrypting payloads such that an attacker can not reuse it to attack other transmissions.

Long Term Secrets:  I know what they mean when they say this, but I’d like to come up with a precise definition of long term secret… we’ll come back to this one.

Current Communications Remaining Secure: This is the part that really got me. Why would someone have to worry about this? This is absolutely savage. What is going on here? Well.. here is what I can deduce: If future communications are compromised, that implies that someone has gotten a hold of a key to decrypt an intercepted payload and done just that…. but the need to protect encrypted payloads transmitted in the past also implies that THEY HAVE THE TRAFFIC.

Are you kidding me? They are on your network running a rogue service with access to an outbound port. Lets get serious about what this means. Attack surface is everything; if you do not have control of what is running in your network, you have bigger problems than will be addressed by TLS 1.3. This is making me too upset and I need to go calm down. While Im counting to ten, lets have you go back to defining the meaning of Long Term Secrets.

The Slack Developer Blog remarked about the usage of a Long Term Secret when they introduced Request Signing and Mutual TLS Verification for their API integrations:

Both Request Signing and Mutual TLS allow verification without sending a secret along with every request, preventing the exposure of long-term secrets — even in the presence of someone intercepting a request or TLS-terminating infrastructure that should not have access to the secret.

Seeing as how they used to issue a predetermined secret over HTTP, I can see how they made the move for protecting their integrations from spoofed requests, but this still doesn’t give us an understanding of the complete details of this secret and what makes it long term. Lets keep digging…

And… yay! It looks like I found something perfect ( ha ) for describing this kind of secret… Im looking forward ( Okay, i’ll stop ) to seeing where it leads. John Deters scribbled out some prose on the Crypto subdomain of stack overflow which will encapsulate this nicely:

A long-term key is one that is deliberately stored somewhere, either on a computer disk, flash memory, or even printed on paper. The key is intended to be used at multiple points in time, such as “I will use this key to encrypt this secret file today, and use it again to decrypt my secret next week.” A long term key can be used for any purpose, including stored information as well as transient communications.

So, what does this point us to? Certificates! Private Keys! The most protected element of the cryptography process. Now, as my intolerance for ambiguous verbiage has made itself known to all on this soul searching quest to find meaning ( for a word :), the beauty of the analyst’s quest for exacting definitions is on display. Sometimes you just have to go hunt some things down and make the kill… the best part of which is all the other little mysteries and rabbit holes that make themselves known. If we read further down the page we see John continue with ( may I call you John? ) a specific point of interest:

* Note that an attacker can certainly record the session key exchange, and if they can break the key exchange cryptography they can decrypt the session key.

“Do you know what this means?”“It means that this…damn…thing…doesn’t work at all!”

Key Exchange Cryptography?! What does that mean!!? How exciting… a new snake pit for us to jump in. We will talk about that next time….but for now, the moral of this story has really been the underlying cause for the importance of Forward Secrecy — the fact that you may have someone on your network or on your workstation running a tcpdump of every network request in sight. Sort of parallels the focus on output sanitization for mitigating your XSS issues.

Take care. And remember: Ya suspect!

Reviewing the improvements to Burp Suite – The Crawler + Basic Setup

The Crawler – Still arachnid based, never fear.

I have always wondered how application crawlers were going to deal with the problem of infinitely crawl-able application spaces that self enumerate your efforts to map an application into oblivion. Now with Burp’s new crawler being able to map a given application through induction, I think it will greatly speed up the process and present data in a much more understandable way. I will post more once I have tried it out.

But first!… I think that Haddix published a great starter intro to Burp Suite in case you haven’t used it before. Check it out here.

Great things to remember that Haddix points out:

  • Setting up multiple profiles in Chrome to keep Burp slender and fit
  • A VPN is useful for masking your IP in case your testing traffic gets you banned
  • Getting your Burp Cert installed in the keychain on your mac for Chrome can be tricky. Un-tricky it here.


Configuring NginX on Amazon Linux


Whoah. It is hard times for the Linux Admin trying to get a new web server off the ground.

Amazon linux does not ship with apt-get or apt-key or any of our Ubuntu favorites. This is a RHEL model boys and girls. And RHEL means yum. And here’s the issue:

We cannot simply install NGINX. Its not in any standard Repo if your instance is fresh from the Launcher. Boo.

sudo yum install epel-release ...? 

Yeah… try again punk. Enabling the extra packages isn’t that simple. We have to go chase them down. Why this isn’t standard? Who knows… but here is the remedy: You have to go chase it down in fedora land and install the rpm file.

( I don’t think you are a punk. Im talking to myself )

sudo yum install –y https://dl.fedoraproject.org/pub/epel/epel-release-latest-7.noarch.rpm

Adding the -y is a nice way to speed things up and answer yes to all the questions beforehand.

What is the lesson here? You really should have a configuration script ready to go, or at least a preconfigured image in your AWS console when setting one of these up again.

— Next Day:

Nope! The lesson is understanding the plight of the admin short on time. I spent a good hour trying to get wordpress up and running but I got lost at the intersection of MySql and libso.03 or something…. I tried to get a handle on it and went so far as to try to install the dependencies manually but to no avail. Apparently this is still an issue:

https://serverfault.com/questions/873955/how-solve-mysql-5-7-dependency

I just need to get this thing up and running so I ran back to Ubuntu 16.04.

Whatever…


newweb

Management: I will supply you with an AWS account and Ubuntu Web Server in an unconfigured state. You will be responsible for uploading the content and taking it live to the public facing IP. Once the site is live and tested on the major platforms/devices/browsers the project will close.

Frameworks: No proprietary frameworks or dependencies are to be used in the development of the site. Your code will need to work on a LnMP stack ( Linux, Nginx, MySQL, PHP ) as that is the web server that I will be building and the environment that WordPress runs on.

Testing: Functional Testing needs to be performed on the major platforms: Windows 10 [IE, Chrome, Firefox], MacOS High Sierra [Safari, Chrome, Firefox], iOS [Safari], Android [Chrome]. Site needs to render without error, display uniformly according to design, render mobile version where appropriate [hamburger must function smoothly ], and allow smooth navigation in each instance.

WordPress: I will setup the wordpress instance but the design will be required to fit around it. Once the wordpress instance is up and live, you will take the design reigns. 

Design:  Front page, About page, Projects page, 404 page, Mobile rendering: I will supply you with the graphics, a general design plan and you will create a mockup via a graphics program and I will review it before we execute on the final design. You will allow for up to three iterations. The code will be written from scratch ( or at least independent of frameworks ) such that it will have portability independent of any platform technologies like Ruby, for example. Navigation will be available across a top-bar, down the side and on the bottom. CSS font layouts are TBD. To create the mockup, we will do a screenshare of some type and use a whiteboard to transmit ideas for how the site will look.

Design of the site will follow these sites:

Danielmiessler.com – [ overall styling, this is a good simulacrum, but my site will have no front page like this one… ]
http://docs.python-guide.org/en/latest/dev/virtualenvs/  [ use font from this site ] – no black topbar though… 

Image will go in top right hand corner. That image will represent 25% of the width of the page. The remaining 75% will have the title of the site in a top bar that you create. Use your own design idea — the title of the site is “The Secure Method”. Just type the words in and frame it up.

The frame of the site will be divided up along the left edge of the corner graphic. Below the corner graphic will be a side bar that will have other content that has not been finalized yet. Please use the graphic sent to Bill for reference. The background will be plain white.

please visit the above sites to get a feel for the design elements that have been assumed.


External API calls/ Analytics Frameworks / Dependencies: NO! Boo!!!!! If I am on the box and I pull up the site using http://localhost and the box has no internet connection, the site should fully render. There will be no dependencies built into the site at all.

Extensibility: I will need to be able to add pages to the site and respective navigation modules as they are needed independent of you. Part of this project will be to create a page template that can be duplicated and titled as needed with instructions for how to add a reference o the new page into the navigation as needed.

Documentation: I will need a written artifact describing the design of the site. A few paragraphs will do Im sure.

Final Deliverable: Final delivery will be achieved once the site is up on the aws instance and platform testing has been verified.


How to respond to Marketing Trash and Associated Clickbait

Anytime you are presented with clickbait, you must respond to it like the garbage that it is, seeking to rob you of your attention for the precious few cents a marketer will get from the thousands that are ‘activated’ from a particular ad being deployed en masse.

If you’re on youtube or some other popular content portal that can self deploy and manage its own marketers ( and not be suppressed by the popular Ad Blocker browser plug-in or equivalent app for your mobile device ) and you see a suggested link that is labeled like the list below, roll your eyes and send bad juju to the owner of said content:

  • 10 ways that blah blah does blah blah blah
  • You will not be the same after reading this!
  • If this wasn’t on video, you wouldn’t believe it!
  • AMAZING!!! ( or anything else in all caps ) 
  • 💚 — Anything with the latest and greatest emoji that has been given unicode representation to now attract your eyes… 

This is the web at its worst. Guard your attention carefully and take steps to build in a discipline that prevents this kind of mental infection. It spreads like a disease without you even knowing it. Install Purify in your iPhone. Install the equivalent in your Android. Then attack yourself for owning an Android.